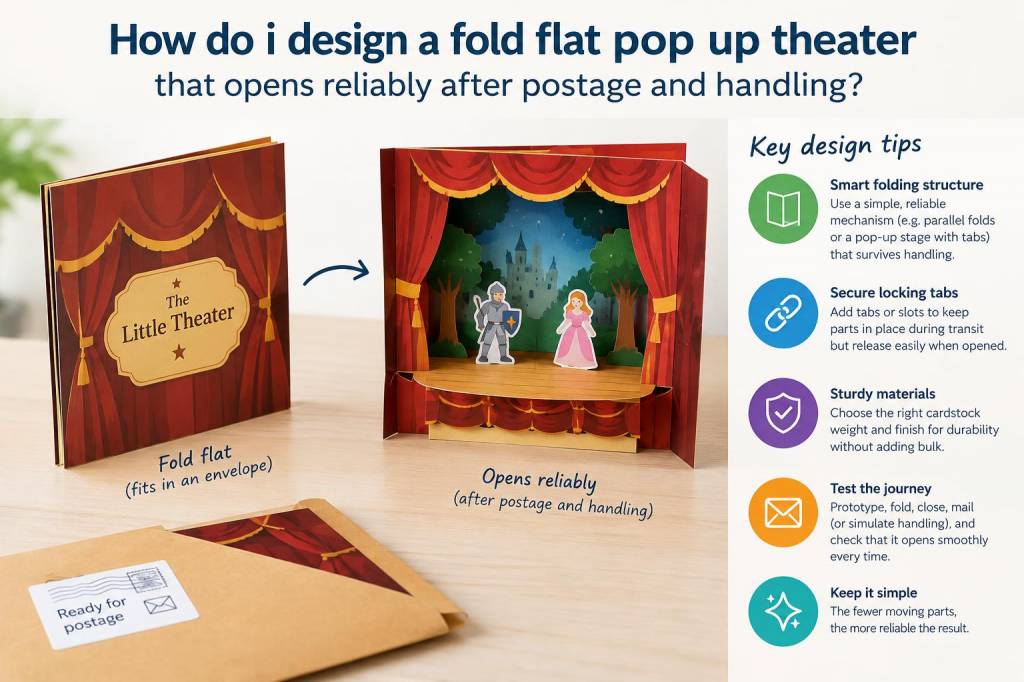
I make a lot of small theatrical paper things in my studio—mini stages, character scenes and fold-flat wonders that travel in the post. Over the years I’ve learned that the charming thing about a theatre that folds flat is also its greatest design challenge: it must be perfectly cooperative with gravity, padding, glue and postal roughness so that it reliably pops up the moment someone opens the envelope. Below I share the practical rules, tricks and test routines I use when designing a fold-flat pop-up theatre that survives handling and opens predictably every time.
Start with the movement, not the decoration
When I sketch a new pop-up theatre I sketch the movement first. Which plane needs to rise? Does the stage curtain need to roll, slide, or spring? Does a backdrop need to tilt back or does a solo character need a simple V-fold? If you map the intended motion before colours and costumes, it’s far easier to make decisions about hinge placement, thickness and clearances.
I often draw three views: flat (closed), halfway (45°) and fully open (90° or more). These quick diagrams tell you where layers intersect and where rub or binding might occur. They become a checklist during prototyping.
Paper choice and thickness
Paper is the most important structural decision. Use heavier card for load-bearing elements and lighter paper for moving surfaces. Common combinations that work well:
- Cover stock / cardstock 250–330gsm for the outer frame and stage floor — sturdy, resists creasing during postage.
- Text weight or light card 120–160gsm for backdrop panels and moving characters — folds crisply and reduces bulk.
- Interfacing layers (thin board or mountboard) for columns or scenery that must resist bending.
I often use Canson Mi-Teintes or a 300 gsm kraft card for outer frames and Bockingford 140–150gsm for printed backdrops. When in doubt, test two weights—too light and the piece collapses; too heavy and hinges tear or the card won't fold flat.
Hinges, scores and fold tolerances
Reliable action depends on crisp, consistent folds. Score every fold line with a bone folder and a metal ruler (I like the Teflon bone folder for glue work). Do not rely on raw folding for thick card; the fibres will burst and the hinge weakens.
Key scoring tips:
- Use a scoring board or a stylus and ruler to create a controlled channel before folding.
- Score on the inside of the fold for heavy card so the outer surface doesn’t split.
- Allow 0.5–1.5 mm gap clearance between moving layers where rub could happen — little tolerances add up fast.
Mechanisms that open reliably
Some simple mechanisms are surprisingly robust when built with attention to scale and glue type:
- V-folds: Classic for characters and small platforms. Ensure the V’s apex hits the stage at the correct point; misplacing it by a few millimetres will cause snagging.
- Parallel folds (box pop-ups): Great for boxy set pieces. Keep internal glue lines thin and avoid over-laminating the floor to reduce stiffness.
- Sliding tabs and rails: Add a thin track (0.5–1 mm clearance) and use low-friction card for the sliding surface; wax-based or silicone paper can reduce friction during testing.
- Elastic or tension springs: Elastic is helpful for repeatable action but makes packing trickier. Use only if your envelope or box allows for a little pre-tension.
I favour passive geometry — designs that rely on paper geometry rather than springs. They’re calmer to post and tend to be more durable.
Glue, adhesives and where to place them
Glue choice matters: PVA (white glue) gives a durable bond but takes time; double-sided tape is instant and neat but can fail under flex; glue sticks are weak for structural joints.
- Use PVA/bookbinding glue for load-bearing joins (I use Lineco PVA sometimes). Apply sparingly and clamp until tacky.
- Use acid-free double-sided tape for thin overlays and printed layers to avoid soak and warp.
- Spot-glue moving joints rather than continuous bead — this allows small flex and reduces rip-through.
A helpful trick: bond with PVA and immediately weight the join with a non-stick sheet and a small flat weight. This flattens glue migration and reduces lumps that could catch during folding.
Layering order and nesting
Think about how elements nest when closed. The outermost frame should be free of delicate protrusions; all moving parts should fold within a recess so nothing presses against the envelope window. Build the fold-flat version in layers and then test nesting step by step.
I create a "closure profile" — a thin card version of the final theatre — to check that nothing extends beyond the allowable thickness. If your postage allowance is a thin envelope, make a mock envelope and fold your prototype closed inside it to check pressure points.
Edges, tabs and locking
Small tabs and interlocking slots keep layers aligned during mailing. Use tiny registration tabs rather than large glued surfaces that add stiffness. A slot-and-tab system is excellent: the tab locks the scene during transit and releases under the correct fold angle.
- Make tabs 3–5 mm wide and chamfer the ends so they slip into slots easily.
- Score the tab base so it rests flush and doesn’t create a raised point when closed.
Packing and postage considerations
Packaging is part of the design. A fold-flat theatre can be sensitive to compression and moisture. My packing rules:
- Use a rigid postcard or thin board (350–500 gsm) as a stiffener in the envelope to avoid bending.
- Wrap the theatre in a thin glassine or greaseproof paper to reduce friction with the envelope interior.
- If the theatre is delicate, consider mailing in a small box or padded envelope. It costs more but reduces returns and complaints.
Also check your national postal guidelines for maximum thickness and declared value. A theatre that’s slightly under the max thickness is safer than one exactly at the limit, because postal sorting machines add pressure.
Testing: the single most important step
I cannot stress this enough: make at least 10 functional prototypes and test them both in the studio and by mailing. My testing routine:
- Open/close cycle: 50–100 times to look for fatigue points.
- Compression test: weight the closed piece under 500–1000 g for 24–48 hours and then test opening.
- Postal test: send prototypes to friends (or to myself) in different envelope types and track arrival conditions.
- Temperature/humidity: if your design will travel internationally, try to expose samples to warmer and more humid conditions (bathroom steam for an hour is an easy test) to check for warp or glue failures.
Record failures on a simple checklist: hinge tear, glue slip, rubbing, stuck tab, crease migration. Each failure suggests a specific fix—thicker hinge, different glue, more clearance, chamfered tab.
Small design nudges that make openings delightful
People love a little theatrical flourish. Here are a few reliable enhancements that don’t harm mailability:
- Add a notch or little finger-tab to the top edge so recipients can open without fumbling.
- Use contrasting colour on edges so the movement reads immediately on the first pull.
- Include a short instruction card printed on the inner flap: “Pull gently at this tab” or a tiny arrow — it reduces accidental rough handling.
Materials and tools I reach for most
| Paper & card | 250–330 gsm cover, 120–160 gsm text, mountboard |
| Adhesives | PVA (Lineco), acid-free double-sided tape (Scotch), Pritt or UHU as light adhesive |
| Tools | Bone folder, metal ruler, scoring stylus, cutting mat, X-Acto/Scalpel, small weights |
These are the practical, patient steps that have made my mailed pop-up theatres behave reliably. The secret, as ever, lies less in a single clever trick and more in measurement, testing and restraint — keeping moving parts light, tolerant and geometrically kind to each other. If you’d like, I can share a printable template for a small fold-flat theatre that demonstrates many of these features in a compact format.