I love a small, secret moment in the mail — something that looks ordinary from the outside but opens to reveal a little bit of mischief. In this piece I’ll walk you through how I design an instant pop-up postcard that conceals a surprise illustration and will still behave like a regular postcard in the post. I’ll share measurements, templates you can reproduce, materials I trust, and a few troubleshooting tips from my own experiments in the studio.

Why A6 postcard size (and postage basics)

When I make pop-up postcards I use A6 (105 × 148 mm). It’s a handy size: small enough to feel intimate, large enough to show a clear illustration, and easy to slide into a standard letter. Most importantly, an A6 postcard gives you plenty of room for a concealed pop-up while staying well within typical Royal Mail postcard dimensions and the area where stamps are normally affixed (top-right corner).

Two quick postal notes I always check before sending handmade mail:

  • Keep the overall thickness under 5 mm and weight under 100 g to avoid extra postage — bulky pop-ups can push you into a higher rate.
  • Place the stamp in the top-right corner of the address side and avoid covering any machine-readable areas. If your design covers the stamp area, leave a clear rectangle about 30 × 30 mm for the stamp.
  • If in doubt, pop into your local post office with a test piece — they’ll be able to tell you if it needs more postage.

    Materials and tools

    Materials Why I use it
    300–350 gsm cardstock (A6 sheet) Stiff enough to mail without an envelope, holds pop-up mechanisms
    Lightweight paper for pop-up elements (90–120 gsm) Easier to fold and glue than heavy cardstock
    PVA glue or double-sided tape Strong bond and a flat finish
    Craft knife & metal ruler Clean cuts and precise folds
    Scoring tool or bone folder Crisp folds for reliable popping
    Pencil, eraser, fine black pen Sketching and outlining
    Watercolour / gouache / markers Illustration media of choice

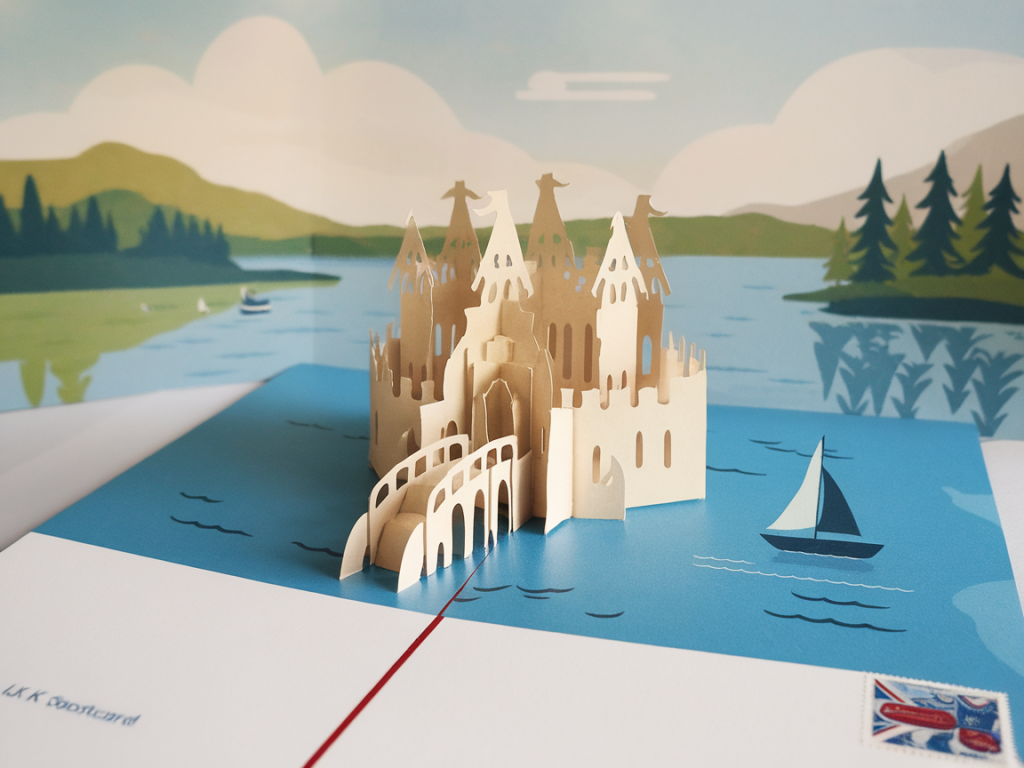
    Basic structure: an instant pop-up with a concealed flap

    The idea is simple: the postcard is a folded card (A6 folded from A5 or two A6 panels) that opens to a pop-up element. The outside looks like a normal postcard; the pop-up sits behind a concealed flap or window so the surprise is hidden until the recipient fully opens the card.

    My favourite approach uses a single A5 sheet folded in half to create two A6 panels:

  • Fold an A5 piece of 300 gsm cardstock down the middle to make an A6 postcard (148 × 105 mm folded to 105 × 74 mm if folding differently — pick whichever orientation you prefer).
  • On the inside left panel I create a pocket/flap that hides the pop-up when the card is closed.
  • The pop-up element is attached to the right inside panel so it springs into view when the card is opened.
  • Step-by-step build (templates you can use)

    Here’s a reproducible method that’s worked well for me. Measurements assume an A5 base folded to A6 — adapt to your preferred orientation.

  • Cut an A5 sheet of 300 gsm cardstock (210 × 148 mm). Score and fold it in half so you have an A6 card (148 × 105 mm).
  • On the inside left panel, draw a rectangle 90 × 60 mm leaving 10–15 mm margin from the edges to avoid interfering with postage or address space. This is the hidden flap. Cut on three sides — left, bottom and right — leaving the top edge attached so it acts like a door that lifts.
  • Optional: add a thin tab (10 mm) along the top edge of the flap to make it easier to open. Decorate the flap’s outer face so it reads as part of the normal postcard interior when closed.
  • For the pop-up mechanism, make a simple V-fold: cut a strip of lightweight paper 90 mm wide and 60–80 mm high. Fold it in half and then make two parallel vertical cuts from the folded edge to about 10 mm from the open edge to create two tabs — these will become your V supports.
  • Score the fold lines for the V supports at about 20°–30° (a slight angle works best). Attach the base of the strip to the right inside panel with PVA or double-sided tape, aligning the bottom edge of the strip with the bottom of the card.
  • Attach your illustration to the V-supports: you can glue a small painted vignette, a cut-out character, or a tiny concertina scene. The key is to keep it lightweight so it pops open fully and doesn’t bulge the postcard closed.
  • Close the postcard and check that the flap on the left conceals the pop-up entirely. The flap should lie flat without pushing the landscape up; if it lifts, trim the pop-up element or reduce thickness.
  • Designing the concealed illustration

    I often design the visible outside of the postcard with a hint — an eyebrow-raising line or a partial drawing — that promises something more. The concealed illustration can be:

  • a tiny character with a movable element (a paper wheel or sliding tab),
  • a fold-out landscape that expands from the V-supports,
  • a layered collage that gives a sense of depth.
  • Keep the hidden piece under 1.5 mm thickness where the flap covers it; multiple layers of heavyweight paint or glued elements can make postable mail require additional postage. Watercolour, gouache gradients, or thin marker layers work beautifully.

    Finishing touches and postal-proofing

    Before you send your creation I always do a few checks:

  • Measure the final thickness with a ruler — if anything protrudes beyond 5 mm, consider sending in an envelope or adjusting the design.
  • Test the card by sending it through your own mailbox first or hand-delivering to a friend to check that it opens and closes reliably. Sometimes the glue needs overnight to set fully before mailing.
  • Reserve the top-right quadrant of the back for the stamp and address. If your design uses that space, draw a clear box 30 × 30 mm and leave it blank.
  • Variations and creative prompts

  • Mini zine pop-up: Combine a few tiny folded pages attached to the V supports for a micro-story that unfolds as the postcard opens.
  • Interactive slider: Replace one V tab with a small paper slider that reveals a message when pulled.
  • Layered windows: Instead of a single flap, cut a series of smaller windows so the recipient peels back layers like an advent calendar.
  • For tools, I love using a metal ruler and Olfa precision cutter for clean edges, and Pritt Stick or UHU double-sided tape when I need faster adhesion with minimal warping. For painting, Winsor & Newton Cotman watercolours or Holbein gouache give reliable, vivid colour without going too thick.

    Troubleshooting common problems

    If your pop-up doesn’t lie flat:

  • Check that all fold lines are scored crisply. Use a bone folder to flatten.
  • Reduce the thickness of the pop-up element: swap heavy paper for 90–120 gsm stock.
  • Reposition the V supports slightly lower so the pop-up sits inside the card pocket when closed.
  • If the postcard bulges and risks extra postage:

  • Flatten all glued areas, remove unnecessary layers, or consider sending the piece in a thin bio-envelope to protect the surprise while ensuring correct postage.
  • Making a small, delightfully secretive pop-up postcard is an exercise in constraints: you must balance whimsy with postal practicality. That limit is precisely what I love — it makes every fold, material choice and little trick feel considered. If you try this, I’d love to see what you make: tag me or drop a picture in the comments on the blog at https://www.maxthemagician.co.uk — I’m always curious to see how other makers solve the same tiny problems.