I love tiny theatrical moments — the quiet drama of a stage, the surprise of a scene that appears when you open a card. Designing a fold-flat pop-up theater that fits in an envelope and blossoms into a staged scene is one of my favourite small-scale challenges. It’s part engineering, part storytelling: you must think about how the paper moves as much as what occupies the space. Below I’ll walk you through my process, from materials and basic mechanics to mailing tips and creative variations, using language and techniques I actually use in the studio.
Why design a fold-flat pop-up theater?
People ask me: why not a regular pop-up card? The theater format gives you depth and a framed view — it feels like stepping into a miniature world. It’s portable, giftable, and when designed to lie flat it can be posted like a normal envelope which makes it perfect for sending surprise scenes to friends. The trick is making sure the mechanism collapses reliably and the finished thickness meets postal limits.
Materials and tools I recommend
Here’s what I usually gather before I start. I pick humble, affordable materials — good paper, a craft knife and a bone folder. I sometimes use brand-name papers (e.g. Arches for painted backdrops, Canson Mi-Teintes for coloured layers) but ordinary 200–300gsm card works fine for the stage.
| Material / Tool | Why I use it |
| 200–300gsm card (white or coloured) | Structure for stages and layers |
| 90–160gsm paper (text weight) | Printed facades, costumes, lighter elements |
| Bone folder | Clean, crisp folds |
| Craft knife & cutting mat | Precise cuts for tabs and slots |
| Glue stick or PVA | Adhesive for paper-to-paper; tacky glue for durability |
| Ruler & pencil | Accurate measuring and scoring |
| Scoring tool / stylus | Helps paper fold without cracking |
| Envelope (C6 or 6x9 depending on size) | Compatible postal format |
Basic dimensions and deciding envelope size
Start by choosing your envelope size. A common, reliable option is C6 (114 × 162 mm) which fits a folded A4 quartered, or a 6×9 inch envelope for slightly larger scenes. I typically design a theater that folds down to a single card thickness under 5–6 mm (including embellishments) to avoid extra postage. Ask your post office for the maximum thickness and flattened dimensions for standard postage if you’re in doubt.
Example working dimensions I use often:
- Final folded size (flat): 105 × 148 mm — fits C6
- Open theater width: 210 mm (two panels)
- Stage depth (usable): 40–60 mm when open — enough for layered scenery
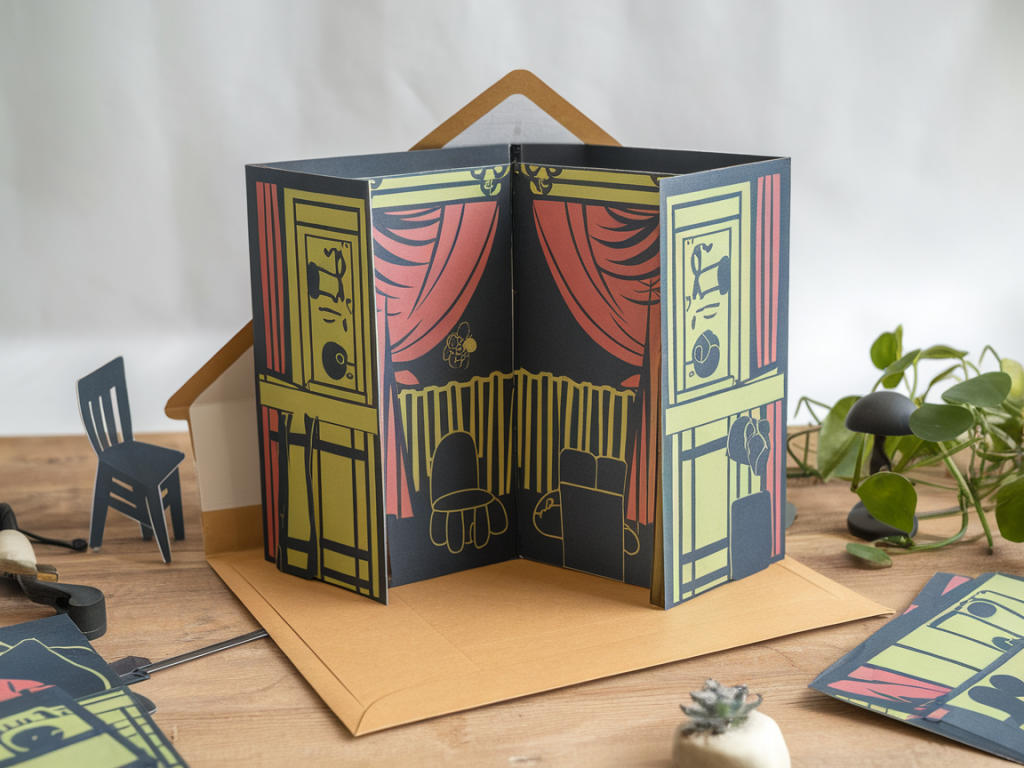
Mechanics: how to fold flat and pop open into a staged scene
The simplest reliable mechanism is two nested panels (front frame and rear stage) joined by a central spine that acts as the hinge. Layers of scenery are attached to the front frame and the rear panel at different depths, using folded tabs or concertina (Z) folds so they stack when flat and expand when opened.
Step-by-step mechanics:
- Cut a base rectangle for the theatre (e.g. 210 × 148 mm). Score it vertically down the centre so it folds in half like a card.
- Create an inner frame: cut a window from a second card slightly smaller than the front half (this becomes the proscenium). Attach it to the front panel edge with a 5–8 mm tab glued so it lies flush when folded.
- For each layer of scenery, cut narrow cards that are as wide as the interior and 30–60 mm tall depending on depth. Add a 10 mm tab at the bottom or side and fold into an L-tab that glues to the floor or side wall. When folded flat the layers sit one against another; when opened they form distinct planes.
- Use small accordion (Z) folds for elements that need extra depth (e.g., a tree that should stand away from the back). Attach one end to the back panel and the other to the layer in front.
- Test frequently: fold the whole assembly flat and open it. Adjust tab lengths and fold-angles until the scene opens cleanly without buckling.
Tips for scoring, cutting and alignment
Clean scoring is everything. I score on the reverse side with a blunt stylus using a metal ruler — this prevents splintering when you fold. Keep glue thin and even: excess glue can cause layers to stick together and ruin the fold-flat quality. When aligning layers, use temporary low-tack tape to position pieces, then glue one edge at a time.
Designing the scenic composition
People often ask me how many layers to include. My rule is: fewer, stronger layers win. Three to five planes create convincing depth without overcomplicating the collapsing action. Plan from back to front: the painted or printed backdrop, midground elements attached to the rear panel, foreground cut-outs on tabs. Use scale cues (size, overlap, value) to suggest distance.
Consider adding little movable bits: a swinging lantern on a narrow strip or a pull-tab hidden at the edge that shifts a character. Keep moving parts lightweight and limit their travel so they don’t interfere with flattening.
Artwork, printing and hybrid techniques
I mix hand-painted backdrops with printed line-work for sharper elements. If you print, use a laser print for crisp edges and for faster colour on thicker stock. For painted skies I use watercolour on separate paper, scan it if I need multiple copies, and paste it to the rear panel. Combine textures — tissue paper for clouds, vellum for surfaces that catch light — to make the scene feel tactile.
Mailing considerations and packaging
Before you send anything, measure the final flattened thickness. If you’re near the postal limit, slip the theatre into a slightly stiffer backing card to protect it during transit. Use a lightweight rigid envelope or a board-backed envelope to prevent bending. If you’re selling these, consider offering an upgrade to tracked postage — nothing ruins the magic like a bent corner.
Address panels and postage stamps can be applied directly to the back if there’s space. If your design occupies the whole back, attach a smaller address card inside the envelope or use a clear address window envelope.
Troubleshooting common issues
- Problem: The theatre won’t lie flat. Fix: Reduce tab thickness, score again and check that glued edges aren’t overlapping.
- Problem: Layers stick during folding. Fix: Use less glue, allow proper drying time, or add thin wax paper between layers while drying.
- Problem: Too bulky for postage. Fix: Simplify foreground elements, use lighter paper, re-calculate accordion depth.
Variations and playful ideas
Once you’ve mastered the mechanics, you can branch out: make a series of mini-theatres that letterbox together, design a peek-through sleeve for a staged reveal, or create a nightlight effect with a vellum backdrop and a small LED tag inside (battery-free flicker stickers or paper circuits with a button cell can be used — I like the simplicity of the Adafruit Coin Cell Holders for prototype work).
If you want a template to start, I often prepare a simple printable PDF with score lines and cut guides — adapt it to your preferred dimensions and paper weight. And most importantly: play. The best discoveries in pop-up theatre come from happy accidents — a too-long tab becomes a balcony; a crooked fold becomes a character leaning in to whisper.