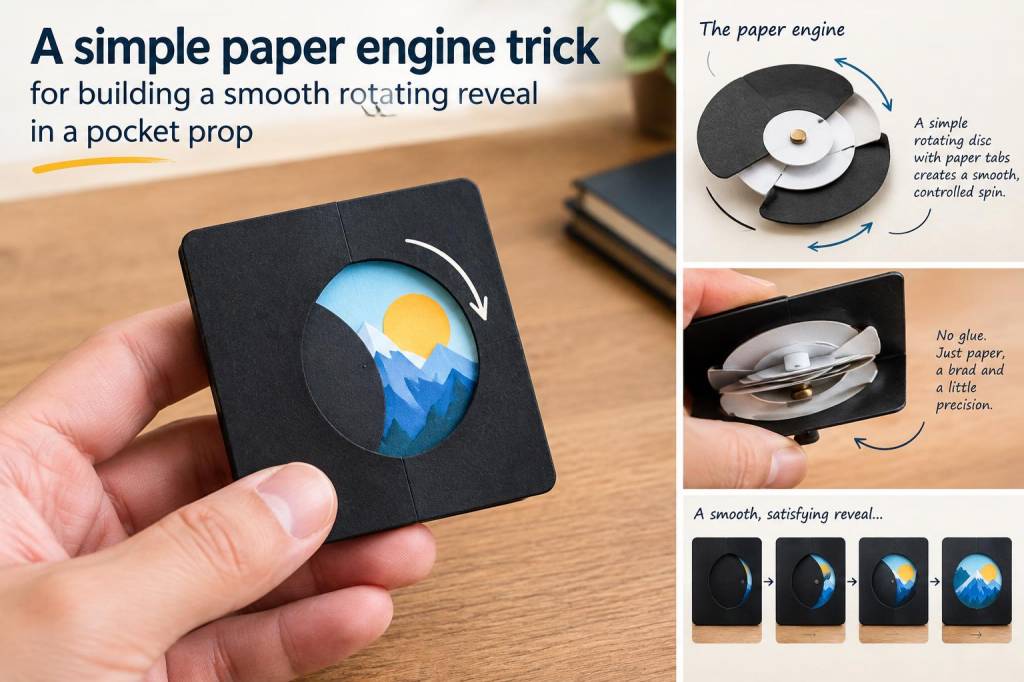
I love pocket props because they ask for a very specific kind of magic: small scale, strong visual impact, and mechanics that feel invisible until the exact moment you want them seen. When I build a reveal inside a pocket-sized object, I want the action to feel smooth rather than fussy, and I want the audience to read it as a single gesture instead of a sequence of awkward moves. A paper-engine trick can do that beautifully. It is light, cheap, easy to test, and surprisingly elegant once it is tuned.
What I mean by a paper-engine trick is a simple mechanical structure made from folded paper, cardstock, and a few careful anchor points. In my own studio, I use this kind of mechanism whenever I want one image, message, or miniature object to rotate into view without visible strain. It is not about engineering in a formal sense. It is about using paper as a clever moving system: a hinge, a track, a stop, and a reveal surface that all cooperate to create a clean visual moment.
Why I reach for paper instead of heavier materials
When a prop lives in a pocket, weight becomes a serious creative decision. Cardboard can be useful, but thicker material often creates bulk, friction, and noise. Paper, especially when layered, gives me much more control. I can test a mechanism quickly, trim a millimeter here and there, and adjust a fold without committing to a rigid build. That flexibility matters when I am trying to create a rotating reveal that feels smooth in hand.
I also like the visual honesty of paper. Even when it is part of a secret mechanism, it still feels handmade and nimble. If I want the prop to disappear into a pocket or slip into a sleeve, paper helps keep the silhouette slim. I can line it with decorative paper, paint it, print on it, or leave it plain while I refine the motion. The material invites experimentation instead of punishing it.
Most of all, paper lets me prototype with speed. I can build three versions in an afternoon, compare the motion, and keep only the one that gives me the cleanest arc. That speed is useful because smooth movement rarely arrives on the first attempt. It usually comes from tiny refinements: a hinge placed a fraction higher, a tab shortened, a pivot hole widened slightly, or a stop adjusted so the rotating surface lands in exactly the right place.
The structure that makes the reveal feel effortless
The core of this trick is a rotating panel mounted on a paper pivot, paired with a hidden support that keeps movement controlled. I usually think of it as a three-part relationship. One part creates motion, one part guides motion, and one part limits motion. When all three agree, the reveal feels smooth and deliberate.
The rotating panel is the visible surface. It may carry an illustration, a symbol, a face, or a hidden message. The pivot is usually a pair of reinforced paper tabs, a narrow brad, or a folded axle that allows the panel to swing. The guide can be a paper channel, a side stop, or a curved slot that keeps the motion from wobbling. If I want the action to look refined, I make sure no single element is doing too much work.
One of my favorite approaches is to build a paper arm behind the panel, then anchor that arm to a fixed base inside the pocket prop. As the user slides, pulls, or opens the prop, the arm nudges the panel through a controlled rotation. This gives me a reveal that feels almost cinematic: the image appears to turn itself, but really it is being shepherded by the hidden arm.
Materials I keep nearby
I do not need a large toolkit for this. In fact, a small set of reliable supplies is usually enough.
- Heavy paper or light cardstock for structure
- Thin decorative paper for visible surfaces
- Scissors or a craft knife
- Glue stick and a small amount of strong liquid glue
- Bone folder or a blunt tool for crisp folds
- Paper brads if I want a mechanical pivot
- Pencil, ruler, and scrap paper for testing
- A cutting mat, especially while refining the pivot area
I keep the decorative layer separate from the structural layer whenever possible. That way I can replace artwork without rebuilding every moving part. It also helps me make adjustments without ruining the finish. A mechanism that works well but looks rough is still progress. A mechanism that looks lovely but sticks halfway through its motion is not yet ready.
My preferred build rhythm
I usually begin with a rough paper mock-up. I sketch the footprint of the pocket prop, then mark where the reveal should begin and end. I like to ask myself a simple question: what is the exact instant I want the audience to notice change? That question shapes everything else. If the reveal needs to feel magical, I do not want the mechanism to announce itself too early.
From there, I cut a plain prototype with no decoration at all. I test the movement with my fingers before adding any artwork. This tells me whether the panel rotates cleanly, whether the arm binds, and whether the stop position is satisfying. I repeat the motion dozens of times. If the action feels rough in my hands, it will feel rough in the viewer’s eyes too.
Once the motion is stable, I start adding surface design. I usually keep the pivot area slightly oversized at first, then trim it down after testing. That extra margin gives me room to correct alignment. If I am building a miniature reveal for a story-driven prop, I may add a hidden graphic that only appears at the final angle. If I want a more theatrical effect, I may design the panel so it starts as one image and ends as another.
Small adjustments that make a large difference
The difference between a clunky mechanism and a graceful one is often incredibly small. I pay close attention to friction, balance, and the path of movement. Paper can drag against paper in ways that are barely visible but very noticeable in use. A tiny dab of dry graphite on a rubbing edge can sometimes help, though I use that sparingly and only after checking whether the problem comes from alignment rather than friction alone.
Balance matters too. If one side of the rotating panel is heavier, the motion can feel uneven. I try to keep decoration distributed, or I counterweight the structure with a hidden scrap of paper. The pivot point should feel centered, even if the visible image is asymmetrical. When the weight is balanced, the reveal lands with a kind of calm confidence.
Another thing I watch closely is the stop position. A reveal feels strongest when it ends decisively. If it overshoots, the illusion weakens. If it stops short, the visual pay-off feels unfinished. I often create a folded paper ledge or a small tab that catches the rotating panel at exactly the right angle. That little stop is one of my favorite secret details, because it does not need to look impressive to do important work.
Ways I adapt the mechanism for different pocket props
This trick becomes especially useful when I change the purpose of the prop. For a storytelling piece, I may use the rotation to unveil a character, a hidden moon, or a secret object tucked inside a miniature scene. For a playful handout, I may use it to reveal a word, a symbol, or a tiny transformation. For a more poetic object, the motion itself may be the entire point: a slow turn from one color field to another, like a tiny stage curtain opening without a curtain at all.
Here are a few ways I adapt it:
- A portrait that turns to reveal a second face
- A closed flower that opens into a hidden illustration
- A card-like object that shifts from plain front to patterned back
- A tiny box insert that reveals a message when rotated
- A pocket talisman with a symbolic image hidden beneath the first layer
I also like to vary the pace. Some props benefit from a quick reveal, while others feel richer when the motion is slower and more deliberate. Paper lets me tune that pace by changing the length of the arm, the resistance at the pivot, or the shape of the guide channel. A longer arm often creates a gentler motion, while a shorter one gives a brisker turn. It is a small change, but the emotional effect can be dramatic.
Questions I ask before I finish a build
Whenever I think a pocket prop is finished, I test it against a few simple questions. Does the mechanism move without forcing? Does the reveal read clearly from the viewing angle I expect? Does the object still fit comfortably in a pocket? Does the motion feel intentional rather than accidental? If I cannot answer yes to all of these, I keep adjusting.
I also ask whether the mechanism supports the mood of the piece. A smooth rotating reveal should not merely work; it should feel in character. If the prop is whimsical, the motion can be slightly playful. If it is mysterious, the turn can feel slow and restrained. If it is elegant, every edge should look quiet and considered. I think of the mechanism as part of the storytelling, not just a hidden device.
| Problem | What I notice | What I usually adjust |
|---|---|---|
| Sticky rotation | Panel catches halfway | Realign pivot, reduce friction, widen clearance |
| Uneven motion | One side moves faster | Balance weight, center the arm, trim asymmetry |
| Weak reveal | Final image feels uncertain | Strengthen stop position, improve contrast, enlarge visual target |
| Too much bulk | Prop no longer feels pocket-sized | Simplify layers, use thinner stock, shorten internal supports |
What I enjoy most about this kind of build
I think I keep returning to paper-engine tricks because they sit at a lovely intersection of precision and imagination. They ask for patience, but not expensive materials. They require care, but not perfection. They reward repeated testing, and they often become better because of the mistakes made along the way. A failed prototype can teach me more than a neat sketch ever will.
There is also a particular pleasure in making motion out of something so ordinary. Paper seems humble until it starts doing something surprising. Then it becomes a performer. A pocket prop with a smooth rotating reveal can feel like a tiny stage, and I enjoy that shift from plain object to animated moment. It reminds me that small mechanisms can carry a lot of feeling when they are built with attention.
Whenever I return to this structure, I find a new detail to improve: a cleaner pivot, a quieter fold, a better stop, a more satisfying angle of reveal. I never quite stop refining it, because that is part of the joy. Paper gives me room to keep listening to the object, keep tuning the motion, and keep shaping a little moment of surprise until it feels alive in my hands.