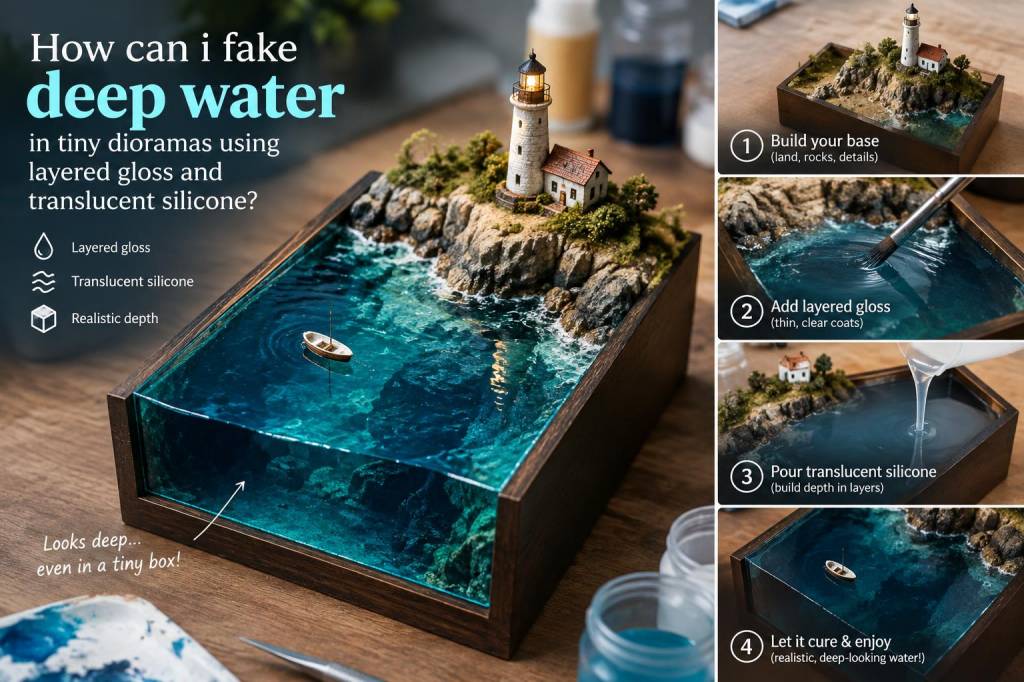
I love tiny dioramas. There’s something deeply satisfying about conjuring a whole landscape in a shoebox or a matchbox — and making water that looks convincingly deep is one of my favourite tricks. Over the years I’ve experimented with resin, varnishes, layered gloss and translucent silicone. For small-scale scenes where working time, smell and fiddly pours are concerns, layered gloss mediums and translucent silicone can be a wonderful, low‑tech route to convincing depth and surface detail.
Why use layered gloss and translucent silicone?
Resin gives very realistic results, but it can be messy, smelly and requires careful mixing and curing conditions. Layered gloss mediums (like Liquitex Gloss Medium & Varnish) and translucent silicone (bathroom-grade or craft silicone) give you more control for small pieces. You can build depth in thin stages, add subtle colour, create surface ripples or oily sheens, and embed objects without the risk of massive poured volumes. They’re also forgiving: if a layer goes wrong you can sand and rework it.
Materials I usually keep on hand
| Item | Why I use it |
|---|---|
| Clear gloss medium (Liquitex Gloss Medium & Varnish or Golden Gloss Medium) | Creates glassy layers, self‑leveling for smooth depth |
| Translucent silicone sealant (neutral cure) | Builds textured surface detail (waves, ripples), flexible and workable |
| Gloss varnish or gloss gel | Final high-shine coat and adhesion between layers |
| Transparent dyes or acrylic inks (Payne’s grey, phthalo blue) | Colouring thin layers for depth illusion |
| Masking tape, foam brushes, silicone spatula, pipettes | Control, smoothing and precise drops |
| Sandpaper (600–2000 grit), scalpel | Refining edges and removing imperfections |
| Disposable mixing cups, gloves, paper towels | Practicalities and cleanliness |
How I plan the illusion of depth
The trick to “deep water” in a tiny scene is convincing the eye that there’s distance between the surface and anything on the bottom. I plan in layers:
- Base: paint the “underwater” ground first — rocks, sand, silt. Darker tones recede.
- Mid-layers: thin, slightly tinted gloss layers add the feeling of volume.
- Surface: silicone creates ripples and texture — glossy final coat unifies everything.
That graduated approach mimics how real water behaves: the bottom defines the scene, the body of the water changes the colour and clarity, and the surface introduces reflections and distortions.
Step-by-step technique
Below is a workflow I use for a small pond or harbour in a 1:48 or 1:35 scale diorama. Adjust volumes and drying times for your scale.
1. Prepare the base: Paint your bottom layers first. Use matte acrylics for sand and stones. Add tiny washes of darker colour to suggest depth and shadow. Seal with a clear matte varnish so the paint won’t lift when you apply wet mediums.
2. Mask edges: Use low‑tack masking tape to define where the water will sit and protect surrounding scenery. Build a thin rim if needed (card or clay) so wet layers have a small containment area.
3. First glossy layer — the “water body”: Mix a small amount of transparent acrylic ink or Payne’s grey into gloss medium. Keep the tint very diluted; you’re aiming for a suggestion of colour, not an opaque fill. Apply with a foam brush or pour tiny amounts with a pipette and spread. This layer is thin (0.5–1 mm). Let it dry thoroughly — 24 hours is a cautious call but may be quicker depending on brand and humidity.
4. Add mid-layers for depth: Repeat with 1–3 additional thin layers, each slightly darker or with a faint green/blue shift. Let each layer cure fully. The visual depth comes from translucent strata rather than thickness, so patience pays off.
5. Place submerged elements: If you want small rocks or algae under the surface, press them gently into a still‑tacky layer or glue them down before sealing with another gloss layer. Tiny bubbles under these items add authenticity; don’t panic about them — you can clear them later.
6. Creating surface texture with translucent silicone: For ripples and waves I use a neutral‑cure translucent silicone (RTV). Put a bead on a palette and use a silicone spatula or toothpick to lay down lines and crescent shapes where water would catch light. For very fine ripples, dilute a little silicone with a smear of clear gloss gel — this softens the bead and helps it spread into thin, layered ridges. Work in small patches so you can shape them before the silicone skins over (skin time varies, read the tube).
7. Blend silicone edges: Use a damp finger (gloved) or a silicone tool dipped in baby oil to feather the edges of your ripples. This helps integrate them into the gloss layers beneath and prevents a harsh boundary.
8. Final high-gloss top coat: Once silicone is fully cured (read product instructions; typically 24–48 hours), spray or brush a final clear gloss varnish to unify surface sheen and remove the “matte” look that cured silicone can sometimes have. For tiny dioramas I often use a gloss varnish like Game Workshop Glaze or Vallejo Gloss Varnish; they’re designed for miniatures and come in small bottles.
Troubleshooting and fine-tuning
- Bubbles: Tiny bubbles are inevitable. Pop them with a pin before a layer cures, or use a heat gun briefly (low setting) to coax them up in gloss layers. Don’t use heat on silicone — it can distort.
- Cloudiness: Cloudiness usually comes from trapped moisture or incompatible products. Always use products from the same family where possible (e.g., acrylic gloss medium plus acrylic inks). Allow full cure between layers.
- Silicone adhesion: Silicone won’t adhere to some glossy acrylics unless slightly roughened. If a silicone surface peels, sand the area lightly and read the sealant label (neutral cure adheres best).
- Scale of ripples: Keep ripple size appropriate to your scale. Tiny, consistent waves suggest a calm pond; larger, clustered waves suit a stormy sea.
Finishing touches that sell the illusion
Reflections, specular highlights and subtle surface debris are final details that make a viewer do a double-take. I often:
- Paint a faint, broken white highlight on the very topmost silicone ridges — almost like sun glints.
- Scatter micro‑foliage or a sheen of iridescent medium for oily reflections on still water.
- Add a tiny trail of disturbed gloss behind a scale boat using a toothpick to drag the final varnish while it’s tacky.
Making small water believable is mostly about careful observation: watch a real puddle, pond or harbour and notice how colour, transparency and surface shape interplay. Then translate that into layered, translucent, and textured materials. It’s a slow, playful process — a few quiet hours of building up thin layers usually gets me to something far more convincing than a single thick pour.
If you try this, tell me what scale you worked in and post a photo — I love seeing how people adapt these techniques to different tiny worlds. If you want, I can share a short materials pack list for beginners with links to my favourite gloss mediums and silicone brands next time.