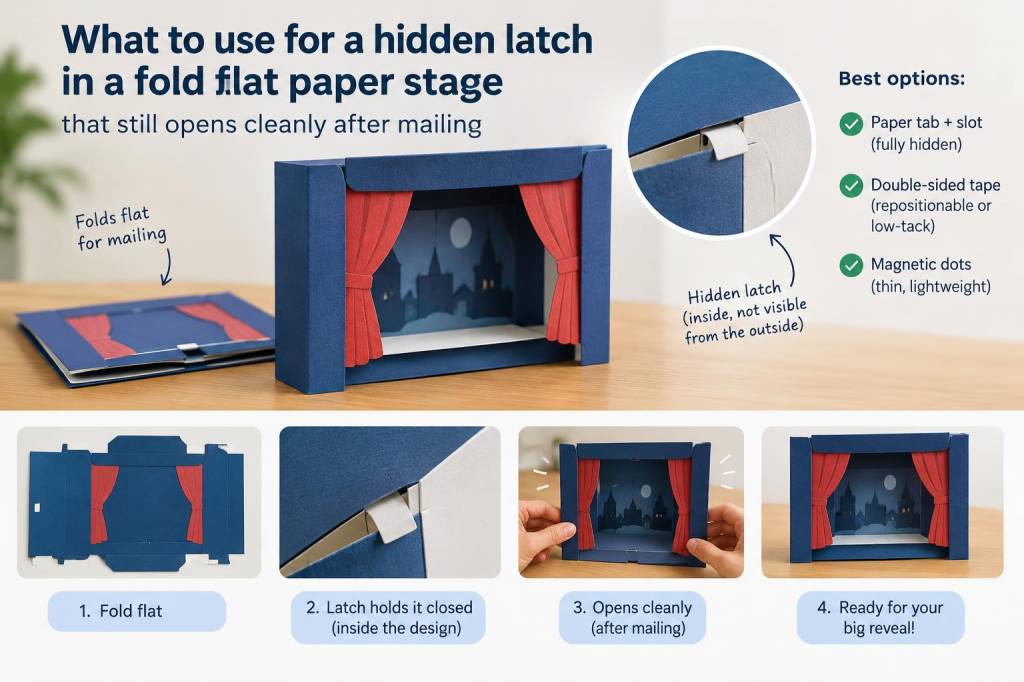
I have spent more time than I care to admit staring at paper prototypes that looked perfect on the bench and then failed the moment I tried to close them for mailing. A fold-flat paper stage is especially unforgiving: it needs structure when it is open, but it must also collapse into a slim, tidy packet without snagging, tearing, or springing open inside an envelope. The hidden latch is usually what makes or breaks that balance. If it is too stiff, the stage fights back. If it is too delicate, it pops loose in transit. If it is too visible, it ruins the illusion.
When I build a paper stage, I want a latch that feels almost invisible when I am looking at it from the audience side, yet easy to release when I open the piece in my hands. I also want something that survives a little pressure, a little vibration, and the occasional postal roughness. Over time, I have found that a clean-opening hidden latch is less about one magical material and more about choosing a small fastening system that respects paper’s strengths and weaknesses.
What I look for in a hidden latch
Before I choose any fastening method, I ask myself a few practical questions. Will this stage be opened and closed many times, or only once after mailing? Does it need a crisp snap into place, or only a gentle hold? Will the latch sit near a folded edge, where thickness becomes a problem? Am I working with light card, watercolor paper, or laminated stock?
For me, a good hidden latch should do five things:
- Hold securely without crushing the paper fibers
- Release cleanly without ripping a seam
- Add very little bulk when folded flat
- Stay hidden from the front-facing view
- Survive postal handling without drifting open
Those five needs usually point me toward low-profile mechanical catches, tiny magnets, paper tabs, or a combination of paper engineering and friction. I rarely rely on glue alone for the moving part, because glued flex points can become brittle or sticky in humid conditions.
My favorite materials for a discreet latch
If I want a paper stage to travel well, I tend to keep the latch materials simple and predictable. Tiny neodymium magnets are a favorite because they are small, strong, and easy to hide inside layered card. A pair of 3 mm or 5 mm magnets can hold a folded structure shut without visible hardware. I like to set them into shallow pockets and seal them with paper layers so they cannot shift.
Another reliable option is a paper tab and slot system. This is the most purely paper-based solution, and it feels elegant when it works well. A tab can tuck behind a slit, under a bridge, or into a hidden pocket. If I reinforce the receiving slot with a second layer of card, the latch stays crisp and the opening action feels neat rather than mushy.
I also use micro hook-and-loop dots when I need a stronger hold but still want easy release. These are not as invisible as magnets, but they can be placed on interior surfaces and concealed from view. The downside is thickness: even a tiny patch can interfere with a very flat fold, so I only use them when a little extra bulk is acceptable.
For very lightweight projects, I sometimes make a latch from waxed thread or fine elastic looped around a hidden peg. This feels more old-world and handmade, and it can work beautifully when the design includes a tiny post or notch. It is less universal than magnets, but it can create a lovely tactile opening moment.
Why I often choose magnets first
If someone asks me what I use most often for a hidden latch in a fold-flat paper stage, my honest answer is magnets. They offer a clean, controlled closure, and they do not require a complex mechanical armature. A magnet can be hidden beneath a decorative panel, behind a backdrop, or inside a side wall, while its partner lives in a folded flap or internal beam.
The trick is alignment. Paper does not forgive sloppy placement. I test the magnet positions before I glue anything permanently, because even a few millimeters can decide whether the stage closes with a satisfying click or with a frustrating sideways pull. I mark the polarity, dry-fit the layers, and make sure the magnets land where the fold naturally wants to settle.
To keep a magnet from telegraphing through thin paper, I usually sandwich it between two card layers and offset it slightly from any printed image that might reveal a bump. If I am working with delicate art paper, I may build a tiny internal platform from scrap card so the magnet sits in a recess rather than bulging outward.
When a paper tab is stronger than a magnet
I reach for tabs and slots when I want the stage to feel entirely paper-built, or when I need a latch that cannot shift under vibration. A well-cut tab can be surprisingly secure. It also gives me more control over how the stage opens: the release can be a soft lift, a tilt, or a deliberate pull at a concealed edge.
My usual approach is to create a tab with a slightly rounded leading edge, because sharp corners can catch and fray. I reinforce the slot with a second layer or a narrow strip of gummed paper on the reverse side. That reinforcement matters more than people expect. Without it, repeated opening quickly turns the slot into a tired, loose tear.
What I like about a tab is that it can be hidden inside a scenic element. A cloud, a curtain fold, a stair edge, or a stage proscenium can all conceal the latch. From the front, the viewer sees only the illusion; from my hand, I know exactly where the release point sits.
My construction method for a clean mail-safe closure
I build the stage in layers so the latch is not carrying all the stress on its own. If a paper stage folds flat for mailing, I want the surrounding structure to guide the fold line and support the closure. I do not want the latch to act like a clamp on a delicate joint.
Here is the sequence I usually follow:
- I mock up the entire fold path with plain card first
- I decide where the natural resting point lands when folded
- I test the closure before adding any decorative artwork
- I insert the latch only after the geometry feels stable
- I open and close it repeatedly to check for wear points
That testing stage saves me from overbuilding. Many people assume a stronger latch is always better, but with paper construction, excess force can create new problems. A latch should support the structure, not bully it.
I also like to add a small buffer layer near any moving part. A narrow strip of lightweight paper or thin card can act as a sacrificial surface, taking the abrasion instead of the visible artwork. If I know a flap will rub during folding, I treat that surface as replaceable from the start.
Protecting the latch during mailing
A fold-flat paper stage can fail in transit if the latch is exposed to pressure, humidity, or sudden jolts. I try to think like the envelope. Where will the stress collect? What edge will get bent first? Which corner is most likely to catch?
For magnets, I make sure they are fully buried and that no loose metal object could interfere with them. For tabs, I keep the receiving slot away from an outer edge so it is not tempted open by an envelope crease. I also use a light belly band or folded sleeve when the stage needs extra protection. That sleeve can be plain, but it gives the piece a second layer of security without changing the actual design.
If the postal journey is likely to be rough, I sometimes add a temporary shipping lock: a removable paper band, a small removable sticker, or a simple slip cover that keeps the flap from shifting until the recipient removes it. I like solutions that leave no residue and do not damage the final object.
Small tests that tell me a latch is ready
When I think a latch is ready, I do not trust my first impression. I test it with pressure, with shaking, with repeated folding, and with a pause after every close. A good hidden latch should feel dependable even after several cycles.
I check whether the folded stage opens cleanly without a tug on the visible face. I look for whitening at the fold line, which can signal stress in the fibers. I listen for a crisp but not harsh snap. If the closure sounds strained, I assume the paper is telling me something.
I also test how the latch behaves after the piece sits shut for a day. Paper has a memory of pressure, and some latches relax or tighten slightly over time. That waiting period has saved me from shipping too soon on more than one occasion.
What I would choose in different situations
| Situation | Latch choice | Why I reach for it |
|---|---|---|
| Very slim folded stage | Magnet pair | Low bulk and clean closure |
| Fully paper-based build | Tab and slot | No extra hardware and good visual integration |
| Need for firmer hold | Micro hook-and-loop dot | Stronger grip with easy release |
| Handmade tactile opening | Thread or elastic loop | Soft, mechanical feel with hidden charm |
| Repeated opening and closing | Reinforced tab or magnet | Better endurance over time |
My own preference usually lands on magnets for a polished finish, then on a reinforced tab when I want the project to remain entirely paper-centric. If I am making a piece for a workshop or a tutorial, I often choose the method that is easiest for others to reproduce with simple tools.
Over time, I have learned that a hidden latch is not just a technical detail. It shapes the whole experience of the object. It determines whether the stage feels magical, clumsy, fragile, or confident. A good latch disappears into the story. It lets the paper do its quiet work, and it allows the opening moment to feel effortless, even after a long postal journey.