I love small projects that teach a technique and a mindset at the same time. A homemade thaumatrope is one of those perfect, tiny bridges between drawing, simple mechanics and the kind of patient repetition that builds confidence. Below I’ll walk you through how I design a one-step thaumatrope kit for kids — a kit that’s easy to use, encourages playful experimentation and gently teaches persistence through drawing practice.
What I mean by "one-step"
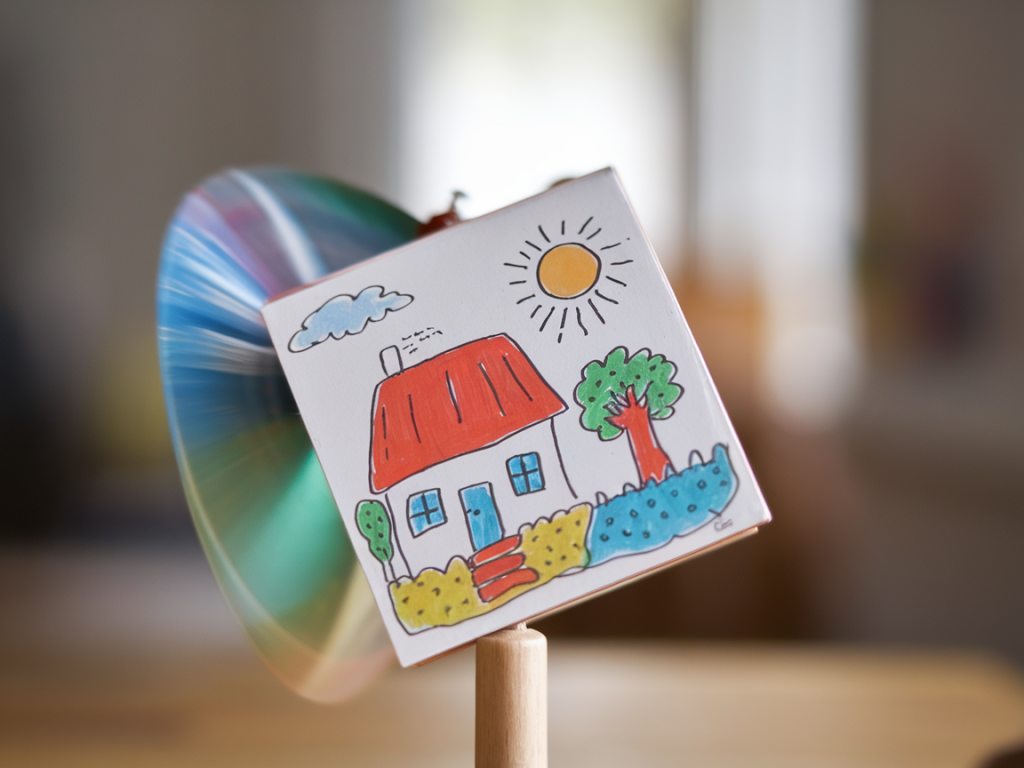
When I say "one-step", I mean the kit requires a single, simple action from the child to make the illusion appear — no fiddly assembly, no tricky knots. In my version the thaumatrope disc is pre-mounted on a short, safe spindle so that the child only needs to spin it to see the two drawings merge into a surprising image. This keeps the moment of delight immediate while still preserving the learning that comes from designing the two images.
Why a thaumatrope is great for teaching drawing and persistence
Thaumatropes are wonderfully forgiving devices. The effect relies on simple visual fusion (the persistence of vision), so even rough, playful drawings read as the intended image when spun. That’s empowering for beginner artists. And because kids can try multiple pairs of drawings quickly, they learn by iteration: sketch, spin, adjust, try again. That loop—make, test, refine—is the essence of persistence in craft.
What goes into the kit
Here’s the contents I include when I design a kid-friendly kit. I choose materials that are familiar, safe and inexpensive so the kit stays accessible.
- Pre-cut cardstock discs (3–4 discs, 70–100gsm Canson or similar). Two faces per disc for front/back drawing.
- Pre-drilled spindle — a short wooden dowel (about 6 cm) with a slightly rounded tip and a base disc glued to prevent the thaumatrope from sliding off. I use untreated beech dowels from a craft shop; they’re smooth and safe.
- Permable mounting ring — a thin foam washer or cardboard ring to space the disc so it spins freely.
- Drawing tools — a washable black fineliner (e.g. Staedtler Triplus Fineliner), a small set of coloured pencils (Prismacolor Scholar or similar) and a felt-tip for bold shapes.
- Templates and prompts — printed sheet with simple guides (cat/body, bird/branch, sun/cloud, cookie/bite) and blank templates for free play.
- Instruction card — visual one-step prompt: "Draw on both sides, mount on spindle, spin."
- Optional stickers and small collage scraps for quick decoration.
Designing the discs: composition tips I tell kids
When I show children how to plan their two images I keep the language playful and concrete. Here are the practical tips I give:
- Think of a simple action split in two — example: a bird on a branch / the same bird in flight; a face / sunglasses on the face. This helps the fused image read clearly.
- Keep the drawings bold and centered — avoid tiny details near the edge; big shapes translate better when spinning.
- Use contrast — a black outline with coloured fills reads faster. If you want colour, use pencils or markers on one side only so the back won’t muddy the image.
- Mirror placement — imagine the two drawings overlapping when the disc flips rapidly. Place key elements in the same position on each face.
Step-by-step kit experience (what the child actually does)
My objective is to maximize the "make-to-wow" ratio: a short making process followed by an immediate, magical payoff.
- Pick a disc and orient it as a front and back canvas.
- Use the template prompts or free-draw with the included pens. Don’t worry about perfection—sketches work fine.
- Slip the foam washer over the spindle, then place the disc on top. (If the kit is pre-mounted, this step is already done.)
- Push the disc down to rest on the washer and spin the spindle between your palms. Watch the two drawings fuse.
Teaching persistence, step by step
Making a thaumatrope is less about the final artwork and more about the process. Here’s how I frame that to kids and caregivers:
- Normalize iteration: "Try it once. If it doesn’t look right, change just one thing and try again."
- Celebrate small changes: Point out how a thicker outline, a shift of a beak or a darker fill can make the illusion read better. These micro-wins build confidence.
- Encourage curious notes: Keep a little sketch log or sticker chart in the kit where kids can mark how many tries they made for a version they liked.
- Model patience: When teaching, I take my own time to redraw a fiddle detail and narrate the thought process: "Hmm, the wings look too low — let me try them a bit higher."
Troubleshooting and variations
If a drawing doesn’t read when spun, here are quick fixes I recommend:
- Make the key shape bolder — thick lines read better.
- Increase contrast — add a solid black shape behind a light element.
- Adjust placement — move the main motif slightly toward the centre.
- Try motion-friendly pairs — static object + action (cookie + bite) often work better than two delicate patterns.
Variations to keep the kit fresh:
- Story sets: Provide three discs that tell a short visual sequence across spins.
- Collage thaumatrope: Pre-cut magazine images to paste for quick results.
- Glow-in-the-dark version: Use phosphorescent paint for nighttime magic (supervised use only).
Safety and age guidance
I design this kit for ages 5+ with adult supervision for younger children. The spindle is short and rounded to avoid sharp points; always check local safety standards if you intend to sell a kit. For preschool ages, you can skip the spindle and make a "twist-and-release" string thaumatrope (two strings tied through either side), but that introduces slightly more dexterity and knot work.
Packaging and presentation tips
When I package kits for workshops or small sales I focus on clarity and delight. Simple kraft boxes, a bright sticker, and a printed card that doubles as a teaching prompt go a long way. Include a QR code linking to a short video of an example spin — seeing it in motion reduces setup questions and increases the immediate joy.
Materials I recommend
Some of the brands I trust for consistency:
- Paper: Canson 160gsm for sturdiness.
- Markers/pens: Staedtler Triplus Fineliner and Tombow Dual Brush Pens (for adults assisting younger makers).
- Wooden dowels: 6 mm beech dowels from hobby shops; smooth and splinter-free.
- Glue: PVA or a glue stick for collage bits (Pritt is a reliable brand).
Designing a one-step thaumatrope kit is as much about the user experience as the component list. If the making feels immediate, visible and repeatable, kids are more likely to try again, refine their drawings and discover that patience is a tool, not a chore. The best kits are little invitations: spin, see, change, repeat—each cycle a tiny lesson in how small adjustments add up to something delightfully new.