I love small mechanical surprises — those tiny moments when something ordinary folds, flips or peels away to reveal a little secret. This hidden-hinge technique using a soda can tab and scrapbook paper is one of my favourite low-tech tricks for making secret flaps in handmade books, greeting cards, dioramas and mixed-media pieces. It’s cheap, durable, and visually discreet when done carefully. Below I’ll walk you through what I use, how I build it, why it works, and a few variations to spark your own playful experiments.
Why use a soda can tab?
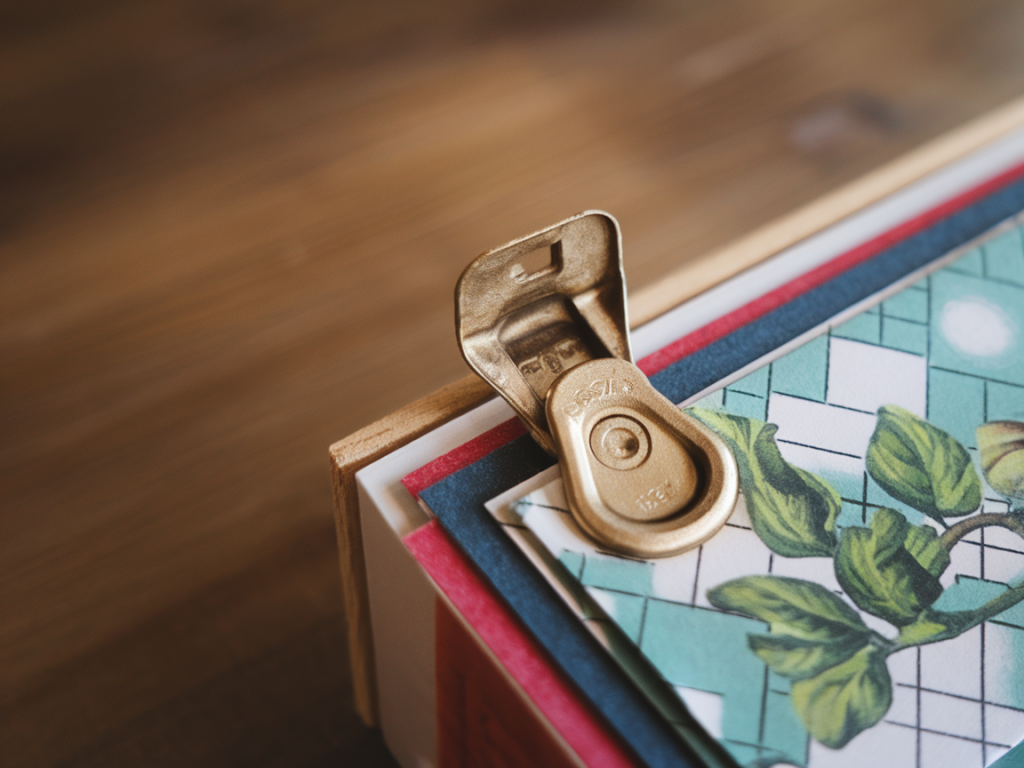
A soda can tab is a small, strong piece of metal with a naturally hinged shape — perfect for making a minimalist pivot. Compared with paper hinges, tabs are more robust, and compared with decorative metal hardware, they’re free and easy to alter. I like that the tab sits flat against the paper when glued, so the flap can appear to be part of the page until you lift it.
Materials and tools
Here’s what I usually gather before starting. I favour accessible, inexpensive materials so the project can be repeated and adapted easily.
- One soda can tab (cleaned and flattened if necessary)
- Scrapbook paper or any decorative paper for the flap and background (I use 120–180 gsm for flaps)
- Plain backing paper or card (200–300 gsm) to give structure
- Strong PVA glue or PVA-based craft glue (I often use Aleene’s Tacky Glue)
- Double-sided tape (low-profile, 3mm–6mm width for neat joins)
- Bone folder or ruler for creasing
- Precision craft knife (X-Acto) and cutting mat
- Scissors
- Pencil and ruler
- Optional: small drill or awl to make clean holes in paper/card
Basic concept
The idea is simple: the tab acts as the pivot for the flap. One end of the tab is glued to the underside of the flap; the other end is glued to the page or backing card. The tab’s central loop allows a small, controlled rotation. The trick is to position the tab so the hinge is hidden inside the sandwich of papers and to choose adhesives that are thin and strong so the flap moves freely.
Step-by-step: a basic hidden hinge
I’ll describe making a rectangular secret flap about 6cm x 9cm; scale the measurements as needed.
- Cut the flap: cut your decorative paper to 6.5cm x 9.5cm so you have a small margin for neat trimming. Back it with thin card (roughly 200 gsm) to make the flap sturdy but still flexible.
- Prepare the backing page: mark where the flap will sit on your base paper or card. Leave at least 3–4mm margin so the flap looks intentional and sits flush when closed.
- Modify the tab: flatten the tab gently with your fingers or a small hammer on the metal side if it’s too curved. You don’t need to remove the loop — that becomes the hinge. If the tab has a protruding center, file it slightly so it sits flat.
- Measure the glue zones: the tab will be split into two glued sections — one glued to the underside of the flap, the other to the backing. I usually leave a 6–8mm central loop area unglued so the tab can rotate cleanly. Mark those zones with a pencil.
- Make guide holes (optional but neat): using an awl or very small drill bit, make two tiny holes through the tab in the glue zones and into the paper/card where they will attach. These help the glue penetrate and create a mechanical bond.
- Attach the tab to the backing: with PVA glue (applied thinly), glue one end of the tab to the backing card where the hinge will live. Press flat, then hold with a small weight or clothespin while the glue sets. Make sure the looped centre hangs over the edge of the glued zone and is free to rotate.
- Glue the flap to the other end of the tab: lift the tab’s free end, apply thin glue to the glue zone, and position it on the underside of the flap’s short edge, aligning the pivot with the folded edge of the flap. Clamp gently and allow to dry thoroughly (I wait at least 30–60 minutes with PVA).
- Finish edges and disguise the hinge: trim any overhang, then cover the hinge area on the backing with a thin decorative strip or washi tape. On the flap side you can add another strip or a tiny paper tab to hide the metal edge.
- Test the movement: once dry, open and close the flap slowly to break in the hinge. If it’s stiff, add a tiny smear of wax (candle or beeswax) to the central loop or sand the tab’s underside lightly where it rubs.
Tips for good results
- Use thin, even layers of glue. Bulky glue causes stiffness and lumps under the paper.
- If your flap is large, use two tabs spaced evenly along the fold for stability.
- When you position the tab, make sure the hinge line is straight. Use a ruler to line things up before the glue sets.
- For archival or cleaner results, use PVA that dries clear. I like Liquitex PVA for art objects because it’s flexible once dry.
- If you’re worried about the metal corroding over time, seal the tab with a tiny coat of clear acrylic varnish (satin or matte) before gluing.
- Avoid hot glue for the tab itself — it can be too thick and brittle for a subtle hinge. Hot glue is fine for attaching decorative trims later.
Troubleshooting common problems
If you encounter issues, here’s how I fix them:
- Flap is too stiff: reduce the glue thickness or thin out the flap backing card. Sand the paper edges slightly so they flex more easily.
- Tab lifts from the paper: implement small mechanical anchor points by inserting a tiny metal staple through the tab into the backing (bend and hide the ends on the back side) or use the tiny guide holes so adhesive seeps through.
- Visible metal edge: disguise with a decorative strip, thin leather, or a piece of washi tape cut to size. You can also paint the tab with a matching gouache colour before gluing.
- Flap doesn’t align perfectly: adjust by trimming the flap edge or adding a thin shim of paper under the flap corner where it sits.
Variations and playful ideas
This hinge works in many contexts. A few of my experiments you might try:
- Mini secret books: use multiple tabs to make cascading flaps that reveal a narrative sequence.
- Interactive postcards: embed a tiny tab hinge behind a stamped illustration so a character’s hat or arm lifts up.
- Mixed-media sculptures: use tabs as articulated joints for small paper-armatures.
- Layered reveals: cut a window in the top sheet and hinge multiple layers beneath to create a layered peekaboo.
- Decorative rivets: use a second tab, cut and flattened, as an ornamental cover plate over the hinge area — paint it first for a vintage look.
| Material | Why I use it |
|---|---|
| Soda can tab | Cheap, durable, naturally hinged |
| Scrapbook paper (120–180 gsm) | Good balance of flexibility and strength for flaps |
| Card (200–300 gsm) | Structure for backing and flap support |
| PVA glue | Flexible, clear-drying bond ideal for paper-metal joins |
Finishing touches
I like to add a little visual cue or micro-pattern so the flap reads as intentional design rather than a random tear. A tiny stamped icon, a stitched edge with embroidery thread, or a dot of metallic pen on the tab’s visible edge are subtle ways to celebrate the hinge. If the flap hides a secret message you can line the interior with contrasting paper or write a short micro-story inspired by the fold — that’s often where the real magic happens for me.
If you try this method, I’d love to see what you make. Share a photo, tell me what worked and what you changed, and we can riff on variations together — there’s always another small surprise hiding in the practice.