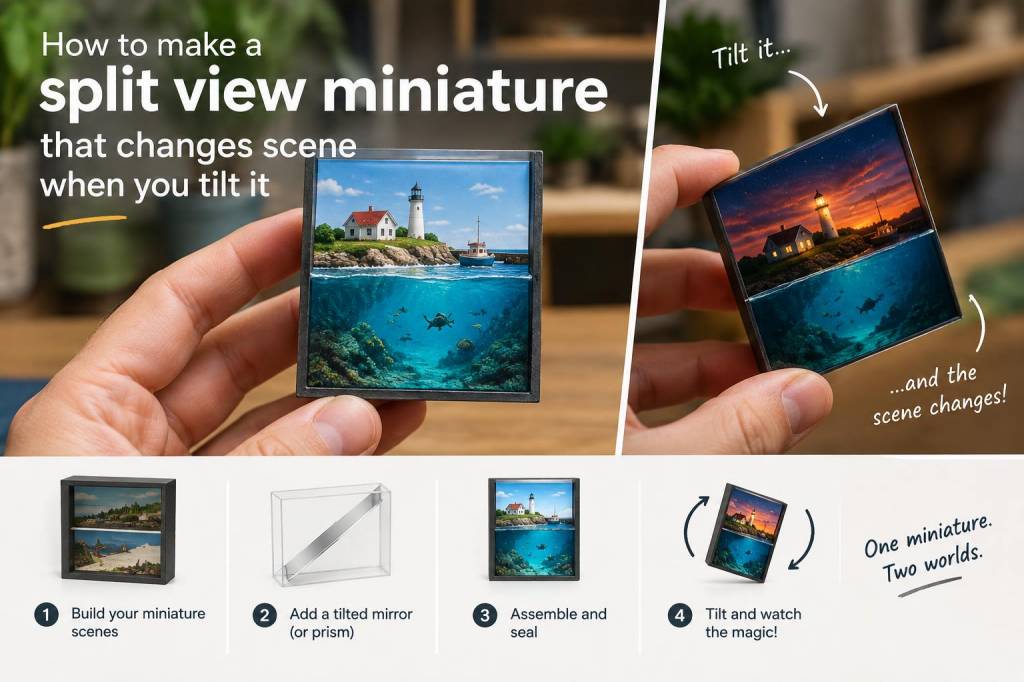
I love making small objects that seem to hold a secret. A split-view miniature is one of my favorite ways to create that feeling, because it gives a single tiny stage two different realities. When you tilt it, one scene appears, then another replaces it, almost like a magic trick built from paper, light, and a little bit of patience. I first fell for this effect because it feels theatrical without needing complicated tools. You can make a convincing illusion with cardboard, printed artwork, a narrow viewing slit, and a simple moving insert. It is accessible, playful, and deeply satisfying when it finally clicks into place.
What I enjoy most is that this kind of miniature is not only a craft object. It is also a storytelling device. A rainy street can tilt into a sunny harbor. A quiet room can become a moonlit forest. A curious character can reveal a hidden secret as soon as the viewer changes angle. That shift gives the piece a living quality, as if the miniature is responding to attention. I like making objects that ask the viewer to move closer, lean in, and participate.
What makes a split-view miniature work
The effect relies on forced perspective and controlled sight lines. In simple terms, I create two separate scenes that are hidden from each other by an angled divider or a layered interior. When the miniature is viewed from one position, only one scene is visible. When it tilts, the sight line changes and the second scene takes over. The transition can be abrupt or gradual, depending on how I build the internal structure.
I usually think of it as a miniature stage with two backdrops sharing one small body. The trick is to keep the moving part invisible from the front while making sure the viewer’s angle does all the storytelling work. That means the outer shell, the inner walls, and the artwork all need to cooperate. If one element is off by even a little, the illusion weakens. If everything aligns, the result feels almost impossible.
Materials I reach for
I like materials that are easy to cut, glue, and test. I do not need anything exotic. In fact, humble supplies often give me the cleanest results because they are easier to shape and adjust.
- Heavy cardstock or thin chipboard
- Mount board or sturdy illustration board
- Fine paper for printed scenes or hand-drawn artwork
- Craft knife and cutting mat
- Metal ruler
- PVA glue or a strong paper glue
- Double-sided tape for quick assembly
- Black paper or matte black paint for hidden areas
- Thin brads, pins, or small paper fasteners if I want a moving insert
- Clear acetate if I want a light veil or reflective effect
- Soft pencil, eraser, and scrap paper for prototypes
If I want a more polished finish, I also use a bone folder for crisp folds and a pair of small clamps to hold joins while they dry. When I am working on a version that needs to travel or survive handling, I reinforce corners with extra paper strips inside the structure. Tiny objects get knocked around more than people expect.
Planning two scenes that can live inside one object
The strongest split-view miniatures begin with a clear contrast between the two scenes. I usually choose pairs that feel different in mood, color, or time of day. One might be warm and bright, while the other is cool and shadowy. Another might show before and after, or indoors and outdoors, or a calm surface and a hidden world beneath it. The more distinct the scenes are, the more powerful the reveal becomes.
I sketch both views side by side before I cut anything. I ask myself what should remain constant, what should disappear, and what should only appear at a certain angle. A shared object can help bind the two worlds together. For example, a tree might stand in both scenes but change from blossom to bare branches. A doorway might stay in place while the room beyond transforms. That continuity makes the illusion feel intentional rather than random.
I also think about scale very carefully. If one scene contains too much detail, the viewer may struggle to read it through the narrow viewing window. I usually simplify forms and keep the compositions bold. Clean silhouettes work better than tiny cluttered marks. In these pieces, clarity matters more than realism.
Building the structure
I start by making a basic box or shallow stage. The exact shape can vary, but I like a front opening with a controlled viewing area and a back or side section where the hidden mechanics can live. If the miniature is meant to be held in the hand, I keep it compact. If it is meant to sit on a shelf, I can give it a little more depth.
Inside the shell, I create a divider that blocks one scene from the other. This divider can be vertical, diagonal, or slightly curved, depending on the effect I want. For a sharper scene change, I use a strong angled partition. For a softer transition, I let the partition overlap with layered cutouts so one image fades into another. The important thing is that each scene has its own viewing channel.
If I am adding movement, I build a rotating insert or a sliding panel inside the box. A pivoting strip can carry one set of imagery into view as another moves away. Sometimes I use a simple paper wheel hidden behind the front opening. Sometimes I make a narrow cartridge that shifts within a track. The motion does not need to be elaborate. It only needs to be smooth and well hidden.
I test the mechanism constantly during construction. I do not wait until the end, because a tiny misalignment can ruin the illusion. I hold the piece under strong light, tilt it slowly, and check what the viewer can actually see. The eye is unforgiving in miniature work. What seems hidden in the workshop may suddenly become visible under daylight or in a photograph.
Designing the artwork for tilt change
To make the scene change feel magical, I treat the artwork as part of the mechanism. I do not simply decorate the miniature after building it. Instead, I design images that disappear and reappear with intention. That means using shapes that can overlap cleanly, forms that can be cut into layers, and colors that support the shift.
High contrast helps a lot. A dark foreground silhouette against a pale background reads clearly from one angle. A vivid accent color can guide the eye toward the moment of transformation. I also enjoy using repeated shapes, such as windows, leaves, stars, or waves, because repetition makes the change feel like a visual rhyme.
When I draw by hand, I often use tracing paper first so I can test overlap before committing to final artwork. When I work digitally, I print several versions and trim them into place to see how the light behaves. Matte paper usually works better than glossy paper, because glare can interrupt the illusion. If I want a reflective shimmer, I add it with care and only where it serves the scene.
Using light as part of the trick
Light changes everything in a split-view miniature. A small opening can glow dramatically if I place a pale surface behind it. A shadowed recess can feel deeper if I paint the interior a flat black. I often think of light as a fourth wall in the piece, because it determines what the viewer can notice and when.
I like to build in a clear front light path and keep the hidden areas subdued. That contrast helps the eye separate one scene from another. If I want a more dreamy result, I soften the edges with translucent paper or thin acetate. If I want a crisp mechanical feel, I keep the materials opaque and the lines sharp. The same structure can feel tender or dramatic depending on how I handle light.
Photographing the miniature also helps me refine it. When I take test images at different tilts, I can spot problems that my eyes miss in real time. Sometimes a tiny seam appears in the photo and pushes me to adjust a wall or repaint an edge. I have learned to welcome those discoveries. They usually improve the final piece.
A simple build sequence I rely on
| Stage | What I focus on | Reason |
|---|---|---|
| Sketching | Two distinct scenes and one shared frame | Sets up a clear transformation |
| Prototyping | Card mock-up with rough angles | Tests the sight line before final cutting |
| Structure | Outer shell and internal divider | Creates the hidden separation |
| Mechanism | Sliding or rotating insert | Allows the scene to change on tilt |
| Artwork | Layered imagery and crisp silhouettes | Makes the illusion readable |
| Light test | Viewing from several angles | Finds leaks, glare, and weak spots |
Problems I expect and solve early
One common issue is a scene that looks good from one angle but collapses from another. When that happens, I usually need to simplify the background or deepen the divider. Another issue is a mechanism that moves, but too loosely. A wobble can break the visual precision, so I tighten the fit or add a paper guide strip.
Sometimes the front opening is too generous, and the viewer sees both scenes at once. In that case, I narrow the window or extend the inner walls. I also watch for adhesive buildup, because a thick glue edge can create unwanted shadows. Clean assembly matters more than people expect. Small excesses in glue, tape, or cardstock can become huge at miniature scale.
If the piece feels flat, I add depth through layering. A foreground object, a midground cutout, and a distant background often create enough space for the transition to feel alive. I prefer a few strong layers over many weak ones. Every layer should earn its place.
Why I keep returning to this format
I return to split-view miniatures because they let me combine illustration, sculpture, and story in one compact object. I enjoy the discipline of making something tiny that still feels spacious. I also love the invitation to move the body a little, to tilt, to peer, to discover. That simple physical action turns looking into participation.
There is something especially satisfying about creating a work that changes without electronics, batteries, or screens. It feels handcrafted in a very literal way. The change comes from paper geometry, clever alignment, and the viewer’s own movement. That makes the final effect feel intimate and alive, almost like a private illusion shared between maker and viewer.
When I build one of these pieces, I usually keep a notebook nearby and jot down every adjustment, because the smallest choices can shift the entire reading of the object. A millimeter here, a darker edge there, a slightly narrower opening, a stronger silhouette, a softer glow. Each decision matters. That is part of what keeps me enchanted by this form. It rewards careful hands, patient eyes, and a willingness to test again and again until the little world inside truly transforms when it tilts.