I’ve always loved tiny moments of surprise: a pattern that shifts when you tilt it, a little mechanism that hides a trick in plain sight. Recently I wanted a pocket-sized kaleidoscope that felt handmade, playful and a little rough around the edges — something you could pull out of a coat pocket and peer into on a commute or a rainy day. This version uses thrifted mirror tiles and a 3D‑printed tube so you can combine found materials and a bit of digital craft. It’s quick to make, low-cost, and the results are reliably magical.
Why thrifted mirror tiles and a 3D‑printed tube?
Mirror tiles from charity shops or thrift stores are wonderfully affordable and often sold in interesting shapes and sizes. They’re thin, lightweight and easy to cut to size. A 3D‑printed tube lets you get precise internal dimensions (important for alignment) and add features like snug end caps, a viewing eyepiece, and a removable object chamber. Plus, printing lets you share a pattern (STL) with friends or tweak the diameter to suit different tiles or lenses.
How it works — the simple optics
A basic kaleidoscope uses three mirrors arranged in a triangular prism so that reflections repeat around the axis. If the mirrors meet at 60° angles, you get sixfold (hexagonal) symmetry inside. The shorter the tube, the smaller the internal field of view; longer tubes give more elongated patterns. For a pocket-sized build I aim for a tube length of about 90–120 mm and an internal mirror width of around 18–22 mm.
Materials
Optional: small files, a heat gun (for cleaning bent mirror tile edges), and masking tape.
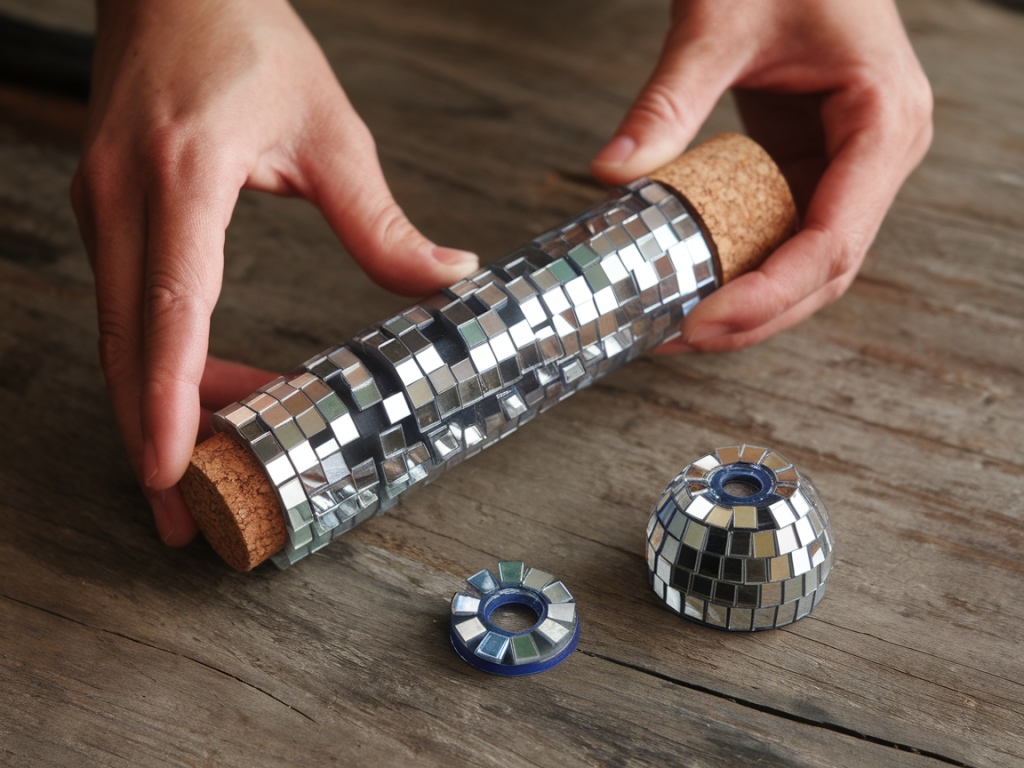
Preparing your mirror strips
I like to find mirror tiles around 40–60 mm square — they’re common and give plenty of material for three strips. Using a metal ruler and a very sharp blade, score the protective backing and the reflective surface lightly, then snap. Thin mirror tiles often snap cleanly; for thicker mirror glass, consider cutting with a glass cutter or finding thinner alternatives like mirrored acrylic sheets.
Cut three strips of equal width. Aim for 18–22 mm for a compact pocket kaleidoscope; larger widths give a wider field of view but need a bigger tube. Once cut, use fine sandpaper to gently smooth any sharp edges. If the mirrored layer chips, a touch of clear nail polish can stabilise the edge.
Designing and printing the tube
If you’re comfortable with CAD, design a tube with an internal triangular recess to hold the mirrors in a triangular prism shape, or design a plain cylindrical tube into which you’ll fix three mirror panels with glue. Include features like:
I designed a 100 mm long tube with a 20 mm internal diagonal for the mirror faces and printed in PLA at 0.2 mm layer height. Use 3–4 perimeter walls and 20% infill for rigidity. If you don’t have a printer, ask a local makerspace or a friend — or commission a simple tube from online printing services using my dimensions.
Fitting the mirrors
Dry-fit the three mirror strips inside the tube to check alignment. They should meet edge to edge forming an internal apex. If your tube has ledges, push the mirrors onto them so the reflective sides face inward. If the tube is plain, use thin double-sided tape on the back of each mirror strip to hold them in place.
When you’re happy with the fit, apply a thin bead of glue along the outer edge of each mirror strip (outside the tube) to fix them. Avoid getting adhesive on the reflective faces — even small smears reduce clarity. Hold each strip until the glue grabs (or tape it while it cures).
Making the object chamber
The object chamber is where the bits of colour and light live. I prefer a simple, removable chamber so you can swap contents. Make a small circular disk from clear acrylic (approx. 20–30 mm diameter) and glue a short clear wall around its edge to create a shallow well. Fill it with a mix of tiny beads, sequins, mylar bits and small translucent buttons. Seal the well with a second clear disk to keep the pieces contained but free to tumble.
If you don’t have acrylic, use clear plastic from packaging or the bottom of a small pill container. The trick is to keep the chamber thin so the bits remain close to the mirror plane — this sharpens the patterns.
Eyepiece and end caps
Use a small acrylic bead or a vintage watch crystal for the eyepiece — glue it into the eyecup cap so you can view comfortably. The eyepiece should be flush with the internal end of the tube so you see the full mirrored pattern without vignetting.
For the object end cap, design or adapt a cap that holds the object chamber and clicks into place. I often add a tiny O-ring groove or a line of rubberised paint so the cap seals snugly and doesn’t rattle.
Troubleshooting tips
Customisation ideas
Make the tube decorative: print it with filament in fun colours, or wrap the exterior with hand-painted paper, leather scraps, or copper foil. Try mirrored acrylic in different colours (bronze, smoke) for subtler reflections. For a tactile version, add a stitched leather sleeve or a small tassel that hints at the vintage pocket-watch charm.
Swap the object chamber contents: press flower petals between thin plastic for delicate organic patterns, or use glow-in-the-dark beads for a nocturnal surprise. You can also add a small LED under a translucent object disk for a light-up kaleidoscope (use a coin cell and a tiny switch in the end cap).
STL and sharing
I often export a basic tube and cap STL with internal grooves sized for 20 mm mirror strips. If you want it, I can share a printable file you can tweak — change length, add a clip or carve a signature groove. Printing settings that worked for me: 0.2 mm layer, 3 perimeters, 20% infill, PLA at 200°C with a 60°C bed. PETG needs slightly higher temps and can be tougher to sand but gives more resilience.
This project is exactly the kind of small, material-led experiment I love: combining secondhand finds with a little digital craft to make something unexpectedly delightful. If you make one, tell me what you filled your object chamber with — I always enjoy seeing the tiny worlds people create.